Highlight Required Controls (End-User Defined)
Nope, you are not seeing double, there is a Function (fHighlightRequiredControls()) that does this. That one works great when the required fields will always be the same: Orders will always require an Order Number, Purchase Order will always a PO Number and a Date. However, some customers may want data entered in specific fields to it will sync with their system and\or show up in reports. For these cases you can give the End User a way to change the *required* fields without calling you for a 10 minute change.
Nope, you are not seeing double, there is a Function (fHighlightRequiredControls()) that does this. That one works great when the required fields will always be the same: Orders will always require an Order Number, Purchase Order will always a PO Number and a Date. However, some customers may want data entered in specific fields to it will sync with their system and\or show up in reports. For these cases you can give the End User a way to change the *required* fields without calling you for a 10 minute change.
The difficult I do immediately, the impossible takes a little bit longer.

And here comes the tedious part but the good news is once you are done you never have to worry about it again. Go to each Form and in the combo box you use to look-up the Customer you need to add the corresponding qryDataEntry.... So for Coil Receipt Form (do not copy\paste as there are line break and it will not work)...
Hmm, so let's get this out of the way. THIS is NOT a normalized table. THIS is the exception to the rule. Now on to business...
Get out some paper so you can keep a Legend, you're going to need it later.
Assign each primary table a number and write down the number assigned to each table. I use a table tlkpAreas, however it is not required so unless you plan to tlkpAreas in other areas of your database no need for you to create it. Note, this is for the database, no one will ever see this except you.
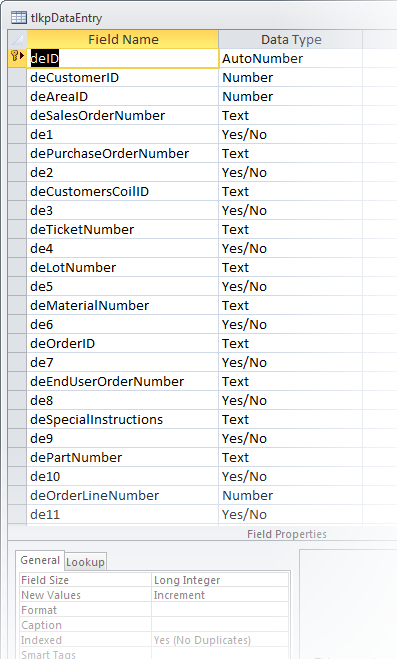
Now create table tlkpDataEntry and enter the fields that *may* need to be required for all primary tables, i.e.
Order Entry - deOrderID, deOrderLineNumber
Material Receiving - deTicketNumber, deLotNumber
Bill of Lading (shipping) - deBillOfLadingID, deCarrierID
Set those Data Types to match the one in their primary tables. For each field created add de(and a number starting at one) field, i.e. de1, de2, and set the Data Type as Yes/No with a Default of False or 0 if not set automatically.
Then add deID (Primary Key), deCustomerID (or deClientID) and deAreaID, save and close.
While you are doing this write down the deNUMBER and what field if corresponds to, i.e. de1 - Sales Order Number, de2 - Purchase Order Number, etc. on your paper.
Get out some paper so you can keep a Legend, you're going to need it later.
Assign each primary table a number and write down the number assigned to each table. I use a table tlkpAreas, however it is not required so unless you plan to tlkpAreas in other areas of your database no need for you to create it. Note, this is for the database, no one will ever see this except you.
Now create table tlkpDataEntry and enter the fields that *may* need to be required for all primary tables, i.e.
Order Entry - deOrderID, deOrderLineNumber
Material Receiving - deTicketNumber, deLotNumber
Bill of Lading (shipping) - deBillOfLadingID, deCarrierID
Set those Data Types to match the one in their primary tables. For each field created add de(and a number starting at one) field, i.e. de1, de2, and set the Data Type as Yes/No with a Default of False or 0 if not set automatically.
Then add deID (Primary Key), deCustomerID (or deClientID) and deAreaID, save and close.
While you are doing this write down the deNUMBER and what field if corresponds to, i.e. de1 - Sales Order Number, de2 - Purchase Order Number, etc. on your paper.
SELECT
qryClientNames.cpCustomerID,
qryClientNames.Client,
qryDataEntryReceiving.de1,
qryDataEntryReceiving.de2,
qryDataEntryReceiving.de3,
qryDataEntryReceiving.de4,
qryDataEntryReceiving.de5,
qryDataEntryReceiving.de6
FROM qryClientNames LEFT JOIN qryDataEntryReceiving ON qryClientNames.cpCustomerID = qryDataEntryReceiving.deCustomerID;
Forms
| Tips (Main) |
| Home |


Create a query for each of the Forms you are going to use this on. For this example:
• Form: Coil Receipt
qryDataEntryReceiving (SQL below)
• Form: Order Entry
qryDataEntryOrderEntry
• Form: Bill of Lading (and Special Bill of Lading), much of the same fields so one query will do
qryDataEntryShipping
In the Query, only add the deNUMBER fields that pertain to that area to the individual queries along with deAreaID and
deCustomerID, so for Coil Receipt which I have assigned AreaID as 23. When adding you deNUMBER fields to the query it
is best to keep them in numerical order, just makes it easier. On your paper write down which ones are in which query
keeping them in the same order in which they are in the query. This is why I recommend following numerical order, less
writing.
SELECT
tlkpDataEntry.deCustomerID,
tlkpDataEntry.de1,
tlkpDataEntry.de2,
tlkpDataEntry.de3,
tlkpDataEntry.de4,
tlkpDataEntry.de5,
tlkpDataEntry.de6
FROM tlkpDataEntry
WHERE (((tlkpDataEntry.deAreaID)=23));
You may also want to create a query for your Customer's names, I use qryClientNames.

Again, best to do this in numeric order.
READ ME: Follow Step 3 thru Step 4 for each each Form you want to apply this to.
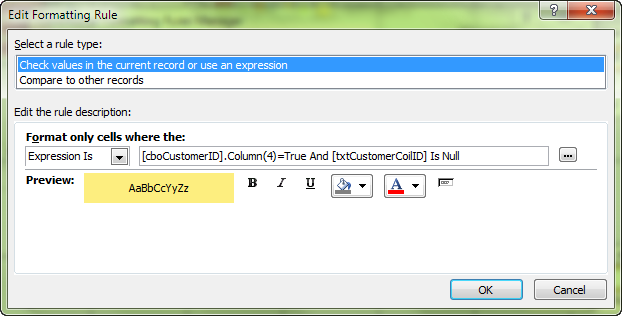
Repeat the above for each Control on each Form until done. (Pick your own color, I just happen to like yellow, it pops.) Don't forget, combo boxes column numbers start with 0 (zero). So while it says Column(4) it is actually columns 5.

Now, once you have the updated Row Source to their Customer Combo Box done go to each control on your list (from tlkpDataEntry), one at a time, and click on Conditional Formatting on the Format tab and use the below matching to your field names...

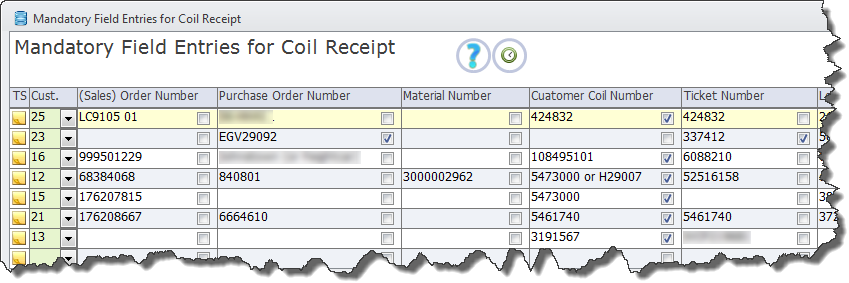
Now create a Form for your End Users to select which fields the Customer want to be required. This is where the other fields from tblkpDataEntry get used. I also put a sample of the type of data that should be entered. This is helpful for training purposes and to identify what value the Customer uses.
You will need a separate one for each primary table. I find it's easier than trying to put them all on one Form which can become confusing to some End Users.
You will need a separate one for each primary table. I find it's easier than trying to put them all on one Form which can become confusing to some End Users.
You'll notice a Note command button to the left. I use this to record what data was changed and who changed it. No worries, I don't expect the End User to remember to enter a note. If they don't I have some code that runs when the Form is closed that automatically logs that along with a audit trail to log data changes. You might want to consider something similar in case of *operator error*.
All done. Enjoy!
All done. Enjoy!
The Conditional Formatting picks on which ones are ticked true, by Customer and turns the field yellow on the Form until it is filled in.